Wednesday 30 January 2008

The Time Has Come

For my baby to start highschool. Can you believe it? I sure can't. I'm sure she was just a tiny baby not that long ago. But still, here we are, the first day of highschool. She looks so grown up in her new uniform....don't you think?

She hasn't lost her silly sense of humour though, as shown in this goofy pose she struck whilst I was snapping some pix to record this milestone.

She does have a much more serious side now though, as you can see in this shot (I think she had had enough of me taking happy snaps).

She had a great first day at her new school. Let's hope that everyday is as good as the first one.

Tuesday 22 January 2008

Some Recent Scrapbook Layouts

Well, I've been a little slack with sharing of late, so I thought I would do a little catch-up. Actually, I'm still catching up on my backlog of photos I have to scrap too. All of these photos were taken before we moved back from Cobar, but I have only just got around to scrapping them over the summer.

This first one uses a bunch of Sandylion papers (and a Sandylion border sticker), a chippy flower and buckle from TLC and some ribbons and a button from my stash.


I used some of the papers from the huge KI Memories designer paper pad I got from Spotlight fro this next layout. I have distressed them all by sanding with fine sandpaper. The chippy letters and photo corners are from Heidi Swapp. I covered them with some of the plain paper from the paper pad and then sanded them. There is also some black fibre and some word beads from my stash.


This is another one using papers from the same KI Memories pad. I also used some cardstock from my stash that I have had for eons. The chippy letters were picked up really cheap at the $2.00 shop. The ribbons came from a giant ribbon pack I got at Big W. The photo corners are Heidi Swapp. The flowers were made with my new medium funky flower punch and a circle punch for the centres.


This one is really simple. The Basic Grey paper was so pretty, I didn't have to add much. I didn't want to cover it up. All the cardstock is Bazzill (don't as my the colours because they are all scraps from my scrap box - LOL). The letters were cut using a template. The flowers were made using Carl punches and I used tiny silver eyelets for the centres.


More Basic Grey paper here (don't you just love the stuff?) and bazzill card (I know the colour is Java because it is my favourite dark brown colour). I used a scrap of pink bazzill to mat the photo. I cut around the flowers and leaves on the paper and tucked the photo underneath. I journalled with a gold pen around the leaves. The chippy letters are Scenic Route.


Yet more Basic Grey papers. (Yes I have and addiction.) The card is Bazzill from the Doodlebug line. The letter stickers are from American Craft. The chippy buckle is TLC. The mesh and ribbons are from my stash.


And now for something completely different. I try, at least occasionally, to use up some of the million different bits of 'must have' pattern papers I have collect over the years. I used up a stack of those on this layout. All the papers are diamond dust papers from Paper Adventures (so they have lots of bling!). I cut the butterflies from one of the papers and used foam tape to pop them up a bit. Unfortunatly, the scan doesn't do it justice. It really is pretty and sparkly.


This layout is another one made with papers from the KI Memories pad, except the orange paper which is some old TLC paper from my collection, as is the chippy buckle. I have distressed all the papers with fine sandpaper. The chippy letters and brackets are from Collections; I covered them with the orange paper and then distressed them with sandpaper. The ribbons are from the pack from Big W I mentioned earlier and the flowers are from my stash.

Although it doesn't show up well in the scan, this layout uses Bazzill Bling paper. The pattern and texture papers also have the same pearly finish. I couldn't tell you the brands, they were A4 sized sheets I picked up at my local craft shop in the cardmaking section. The lacing is opalescent (although it doesn't look it in the scan) and it is from Francheville. The letters were cut using a template. The flower and gem are from my stash.


This one uses cardstock from my stash (no idea were I got it since I am such a collector). The flower paper came from my local craft store, but I couldn't find a brand name on it. The ribbon is from the Big W ribbon box. The ric-rac is from my stash and the epoxy sticker is from a pack I picked up at the $2.00 shop.


Well, as they say in the cartoons....that's all folks. I hope you enjoyed them.


Friday 18 January 2008

Preserves

It's that time of year in her Australia, the time when home gardeners have a sudden glut of tomatoes and maybe a zucchini or two that has gotten overly large. You know what I mean, one day the zucchini are lovely and finger-sized and then seemingly overnight they grown into something resembling a club that any self-resepcting caveman would be happy to carry. Don't get me started about the whole tomato thing. It seems that there is a conspiracy among the tomoto plants in the garden. Even though flowers and eventually tiny green fruits appear at varying times and you think 'good, looks like I will get a continuous supply of tomatoes for several weeks', the plants hold a meeting and agree on a date to ripen the fruit. So what you end up with is nearly every tomato plant in the garden, no matter what size the fruits are, with lovely red ripe tomatoes, all at the same time. Even if you aren't a gardener, or aren't the recipient of garden donations from well intentioned friends and family, you might just not be able to resist the seasonal bargains on fruit on veg and find yourself with an over abundance of tomatoes ('Did I really buy that many?'). Well, I have a solution. I have made both of these recipes dozens of times, and they are always a hit.


Spiced Tomato Relish
Makes about 6 - #20 fowlers jars or 4 #27s

3 kg ripe tomatoes
500g onions
4 Tbsp salt
6 tsp curry powder
1/2 tsp chilli powder
6 tsp mustard powder
4 cups vinegar
4 cups sugar

Skin tomatoes and cut into chunks and place in large saucepan. Peel onions and chop finely and add to saucepan with tomatoes. Mix in salt. Mix curry powder, chilli powder and mustard powder with a little of the vinegar to make a smooth paste. Stir vinegar into tomato mixture along with spice paste. Mix thoroughly. Bring to the boil and boil for about an hour or so to reduce by about 1/3. Add the sugar and continue to boil, being careful not to burn it, until it is thick. Bottle and process.

Note: Use mild or hot curry powder depending on how hot you like it. I use mild because that suits my family's tastes.


Zucchini Relish
Makes 7 - #20 Vacola Jars

12 cups coarsely ground zucchini, unpeeled (3 very large)
5 medium onions
1 red capsicum
5 tablespoons salt
4 cups sugar
4 cups white vinegar
3 tablespoons cornflour
2 teaspoon mustard seed
2 teaspoon turmeric
2 tablespoons celery seeds

Coarsely grind the onions and peppers. Stir in zucchini and salt. Cover and allow to sit for 3 hours. Drain and rinse well. Combine the remaining ingredients to make a syrup, boiling until sugar dissolves and mixture has thickened. Add to vegetables and cook for 20 minutes. Bottle and process.

Note: If you don't have overgrown zucchini, just use more normal sized ones. I'm not sure how many you would need, but if you try it and can share that information, I would appreciate it.

I have have not given instructions for the actual preseving process or how to clean the jars, etc. I am not an expert in preserving, just someone who loves to make yummy things and be able to store them. You will need to refer to the instructions that came with your preserver for that information. I hope you enjoy these recipes as much as we do.

Tuesday 15 January 2008

Spot and Dot

I thought I would share with you some pix of my furbabies, Spot and Dot. They are two very adorable moggies that we adopted a little over a year ago, and they have brought us so much joy and many laughs since then. In honour of my two spotty furbabies, I am also posting some cat quotes that you can use in your crafting.

A house is not a home until it has a CAT.

Cats are just children with fur.

Cats leave pawprints on our hearts.

Dogs have owners, cats have staff.


"Dogs come when they're called. Cats take a message and get back to you later." -Mary Bly

"As every cat owner knows, nobody owns a cat." - Ellen Perry Berkeley

"There are two means of refuge from the miseries of life: music and cats."- Albert Schweitzer

"Beware of people who dislike cats." - Irish saying


"In a cat`s eye, all things belong to cats." - English proverb

"In order to keep a true perspective of one`s importance, everyone should have a dog that will worship him and a cat that will ignore him." - Dereke Bruce, Taipei, Taiwan

"There is no snooze button on a cat who wants breakfast." -Unknown

"I have studied many philosophers and many cats. The wisdom of cats is infinitely superior." --Hippolyte Taine

Cats
Cats sleep,
anywhere,
any table,
any chair
top of piano,
window-ledge,
in the middle,
on the edge,
open drawer,
empty shoe,
anybody's lap will do,
fitted in a cardboard box,
in the cupboard,
with your frocks-
anywhere!
They don't care!
Cats sleep anywhere.

- Eleanor Farjeon

"Cat people are different, to the extent that they generally are not conformists. How could they be, with a cat running their lives?" - Louis Camuti

Friday 11 January 2008

Santa Photo

This is one of today's accomplishments. I did several LOs today, but I like this one best, so I will share it with you. Like many of my LOs, this one features my gorgeous girl, this time getting her photo taken with Santa. The background paper is from the Kaisercraft winter wonderland collection, bazzil cardstock, MM fibre, Bella jewelled brad and the stickers are part of a couple packs I picked up at the discount store.


Thursday 10 January 2008

Adventures at Taronga Zoo

I've been too busy to do any scrapbooking at the moment (even though I got some very yummy goodies for Christmas), but I will get around to doing some pages and sharing them here eventually. I promise. In the mean time, I want to share with you some pictures taken at Taronga Zoo on the weekend. It was an overcast day and it rained off an on all day (with hot, humid sunny spells in between the showers) but that didn't dampen our spirits or stop us from having a fabulous time. In fact, I think the rain kept the crowds away, so it meant we didn't have to wait long to get close to the enclosures or stand in any queues.

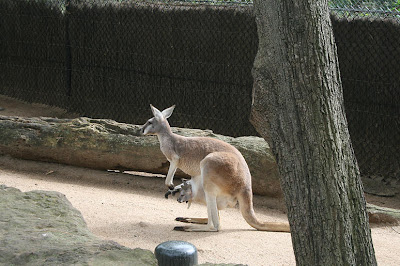
I'll start with a couple of my favourite Aussie animals. I love this picture of a 'roo mum with her joey peeking out.


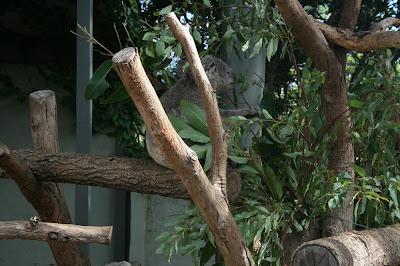
Who can resist taking a picture of a sleepy koala...certainly not me. How cute is this?


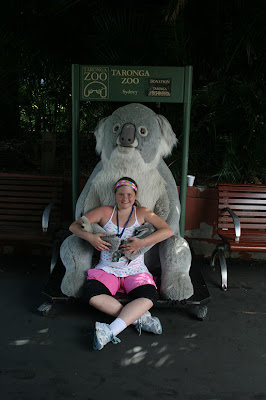
And one of my own cuddly koala....well, okay, it's my daughter with a giant stuffed koala, but she is cuddly anyway.


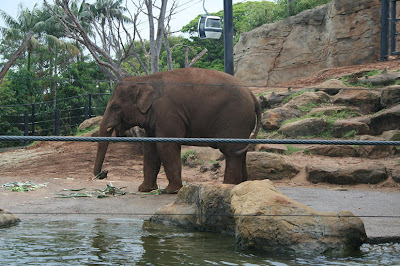
Don't you just love elephants? Well I do. The new elephant enclosure was amazing, and so were the elephants. They can be so entertaining to watch.


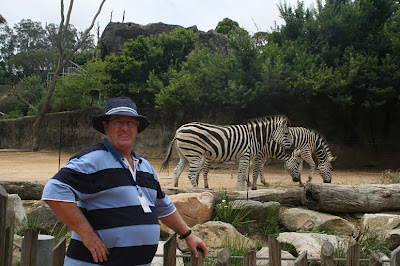
Time to spot the zebra. (I'll give you a hint, it's not the one in blue!) This is hubby posing with his stripy cousins....LOL.


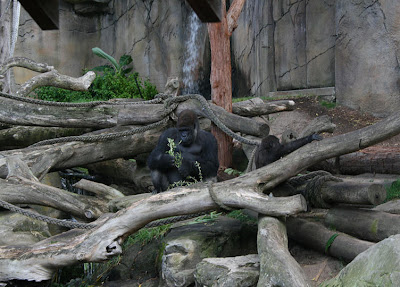
This was one of the few gorillas that would show its face. Most of them were sitting with their backs to me. I guess they're over getting their pictures taken.


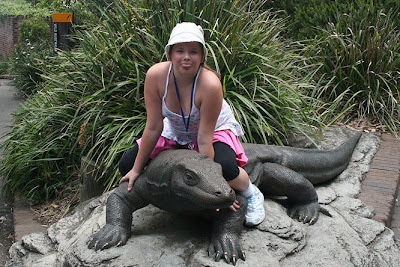
On the other hand, these paler skinned, furless ones were happy to pose for some pictures. Actually, this is me with my daughter posing with some gorilla statues outside the gorilla enclosure.


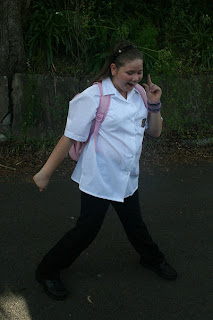
And some more pictures of my cheeky girl with some statues. First with a komodo dragon.


Then with a seal near the newly constructed Great Southern Oceans area (which isn't fully open yet).

Hubby had to get in on the act too. Look and him with a penguin on his head!

Hubby gets a free ride on a richshaw in the Asian enclosures area. Look at the girl pedal...LOL. Actually, I have a picture of the reverse as well (her riding him pedalling....well pretending to). There were several of these rickshaws scattered around the walkways.

Wednesday 9 January 2008

Altered Canvas

I made an altered canvas to give to my mother in law for her birthday at the end of last year. It's fairly simple, but I like it, and so did she. So I guess that is a win-win. I picked up a bunch of these canvases at Riot Art when they were having a moving sale. I got 4 of this 6x6 size and 4 in 8x8 as well. This is the first one I have altered, but I have some great ideas for the others too.

The background was painted with MM paint (I mixed a darker pink and white to get this pale colour). The flower paper is Daisy D's. After painting the canvas, I stuck the paper down with Craft Smart Glaze Paste then gave the whole thing a coat of Glaze Paste. Then I attached the matted photo of my gorgeous daughter.

The flowers are Prima, the jewel brad is Bella.


I'm not sure what brand the ribbons, rubons, beads and stickers are.


The butterfly was part of a sticker sheet I picked up at the $2 shop...what a bargain.

Tuesday 8 January 2008

Delish

I have finally perfected the most delicious cake recipe ever! If you love tropical flavours and want to make something that is sinfully easy but is sure to impress, this is the recipe for you. I should say, I got the original recipe from the Super Food Ideas magazine and I tweaked it until I was happy with it. I hope you love it as much as I do.

Hummingbird Cake
Makes 8 Serves

2 cups plain flour
2 tsp baking powder
1/2 tsp salt
1 tsp bicarbonate of soda
1/2 tsp ground cinnamon
1 cup brown sugar
1/2 cup desiccated coconut
2 eggs, lightly beaten
2 large, ripe bananas, mashed
175 ml canola oil
450g can crushed pineapple in natural juice
Vanilla buttercream icing (see below)
Toasted shredded coconut

Vanilla Buttercream Icing
1 Tbsp margarine (or butter)
1 1/2 cups pure icing sugar, sifted
1/2 tsp vanilla essence
Milk

Preheat oven to 180°C. Grease and line the base of a 6cm deep, 22cm (base) springform cake pan. Sift flour, baking powder, salt, bicarbonate of soda and cinnamon into a large bowl. Add sugar, aand coconut. Stir to combine. Combine eggs, banana and oil in a large jug. Add egg mixture and pineapple (juice and all) to flour mixture. Gently stir to combine. Spoon batter into pan. Bake for 45 to 50 minutes or until a skewer inserted into the centre comes out clean. Cool cake in pan for 5 minutes. Release side and transfer to a wire rack to cool completely.

Meanwhile, make buttercream icing. Mix together margarine, sifted icing sugar and vanilla in a small bowl until it resembles coarse breadcrumbs. Add milk, a few drops at a time, mixing well with each addition, until the icing is has a good spreading consistency. Spread icing over the top of the cooled cake. Sprinkle with toasted coconut. Slice and enjoy!

Monday 7 January 2008

Hello World

Isn't that the first program we all learned to write? Well, maybe not, but it seems appropriate. I hope this blog will be a place for me to share my ideas, creations, photos and perhaps some wit and wisdom (not necessarily my own).

I'll start by sharing a photo I took a few months ago when I first moved back to the coast from the outback (a story I will share another time). This was taken whilst on a walk with my husband and daughter.

This is a view of some of the moorings on the Brisbane Waters, taken from Koolewong. I can't believe we ever thought we could live without this.

Breathe deeply. Don't you just love the smell of the fresh sea air? I certainly do. It definitetly beats the smell of hot, dry red dust.